ECOS user instructions
16 Agosto - 2019
ECOS - Use instructions
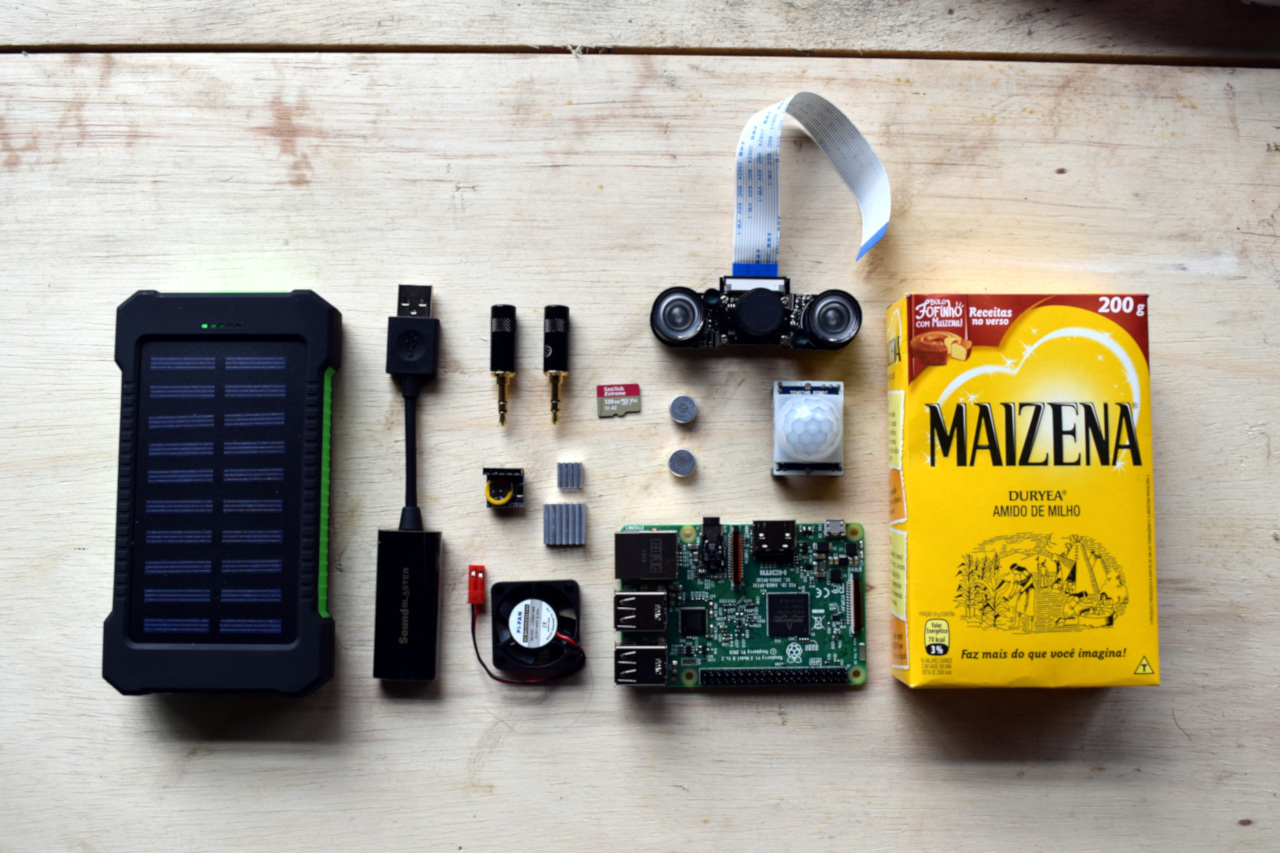
ECOS is a DIY device to record sound in nature. It is a small computer with a mono microphone and other sensors that can be place anywhere in the woods to record the sound of animals.
Device
The first version of the prototype includes:
- A Raspberry Pi 3 Model B v1.2 (Standar user:
pi, standard password for the project:ecos- otherwise look for the standard password for the raspberry). This will be named as RPI, Raspi, etc. - OS Raspbian 9
- NOIR Camera, that will take pictures when there is an animal that pass in front of the camera.
- Ultrasound sensor to measure distances, that will trigger the camera.
- A clock RTC DS3231, that will keep the date once the RPI is without power.
Scheme of use
- Access the device with ethernet/wifi, via ssh, or by connecting a HDMI screen, keyboard and mouse.
- Edit
configEcos.inifile in the/home/pi/scriptsEcos/directory to set up some parameters of the device (fixed IP, energy consumption). - Edit crontab by:
crontab -e, and add one line to do the recording with the specific schedule. - Switch off the device (if it is still with AC adaptor).
- Connect the power bank to feed the device and place it where sounds want to be recorded.
1. Access the device
There are two ways to access the device. In both ways, user will be pi. Standard password is ecos.
- Using ssh via ethernet or wifi. If you are using windows, you will need a ssh client, such as Putty.
- SSH is a protocol that allows to connect safely to other device. The connection is made through a console, only via text (using Linux there is a way to use some graphical aids).
- To connect you will need to know the IP address of the device (this might be different if connected to ethernet or wifi). An IP address looks like: 192.168.111.101. (This IP might be configured in next section via configuration file).
- It is important that your computer is connected to the same network.
- Steps in linux console:
ssh username@IPfor example:ssh pi@192.168.111.101.- Introduce the password of the raspberry.
- Connecting a hdmi screen, a keyboard and a mouse directly to the device.
- In this case, the HDMI screen must be connected before the Raspberry turns on.
- The rasp should be logged automatically.
2. Edit configuration
Modify the configEcos.ini file in the /home/pi/scriptsEcos/ directory to include the following:
idThe id of the device.eth_ipA fixed IP for ethernet. Useful (almost necessary) to access via SSH. If field is empty, RPI will work with DHCP (automatic IP).wifi_ipA fixed IP for wifi. Also useful to access via SSH. If field is empty, RPI will work with DHCP (automatic IP).ecos_recordings_folder_nameSounds will be recorded in/home/pi/Documents/Grabacoes. If this variable is defined a new folder will be created in Grabacoes- GPS coordinates can be fixed via
gps_lonandgps_lat. The idea is to locate the GPS coordinates with a phone or other gps device, and write here the coordinates. This will be place in every file recorded. Therefore every file can be located.
Besides in this file, different devices of the RPI can be turn off/on to save energy. If value=1, it will be on, if value=0 it will be off. It is important to be careful since turning off a device such as HDMI, can be problematic to connect the raspberry.
This system has a security measurement (it has not been totally tested, so be careful): there are some minutes when the RPI inits where everysystem works, so it allows you to change the config file. Right now the ones that are working are (more testing is needed):
- wifi_on
- leds_on
- hdmi_on
3. Create a schedule for recording
To create a schedule for recording, once connected to the RPI, execute crontab -e. This will open a file in “nano” editor.
Follow the examples at the end, and write a line in the same way but with the new schedule.
Once written press Ctrl+x to close. It will ask you to save it. Press S and then when asks you about the name of the file just press intro to overwrite the previous one.